Savvy Spender Logo

Savvy Spender Tutorial

Savvy Spender™ helps you capture receipts and income, organize everything into categories, and visualize your spending with dashboards and reports. This guide walks you through the main tabs, the most common workflows, the new Scan Widgets experience for faster capture from your device desktop, the Group Sharing feature for collaborating with others, the Cost Split feature for tracking who paid what, and the new Tax Deduction tagging for simplified year-end prep.

Good to know: Some features vary by plan. During the initial trial, you receive a limited number of AI scans over a limited time. After the trial, free users have a more limited feature set, including a limited history look-back, and you will see upgrade prompts. Paid users receive expanded access, including unlimited history.

Quick start

  1. Open the app and sign in, or create an account.
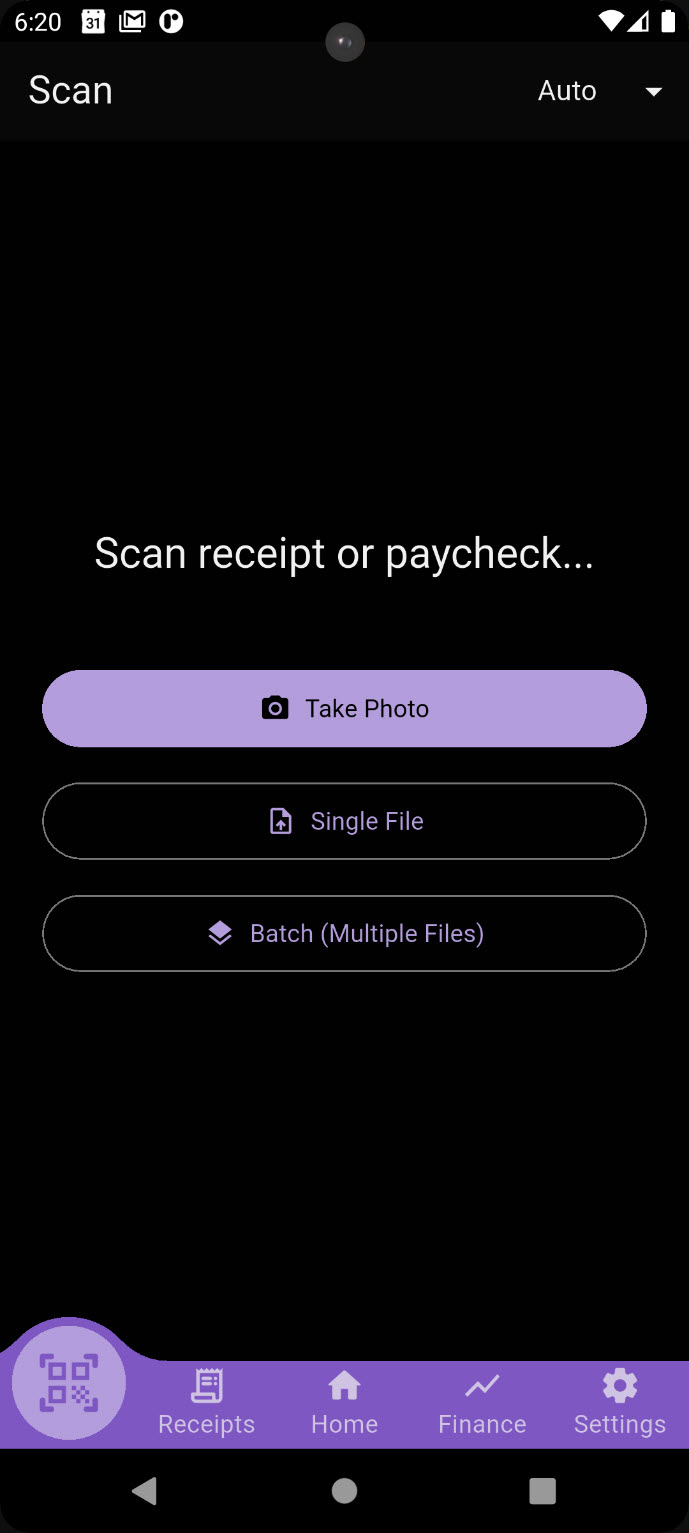
  2. Go to Scan and capture your first receipt using the camera, or select a receipt file from your device.
  3. Review the results, then save. Your receipt is added to your history.
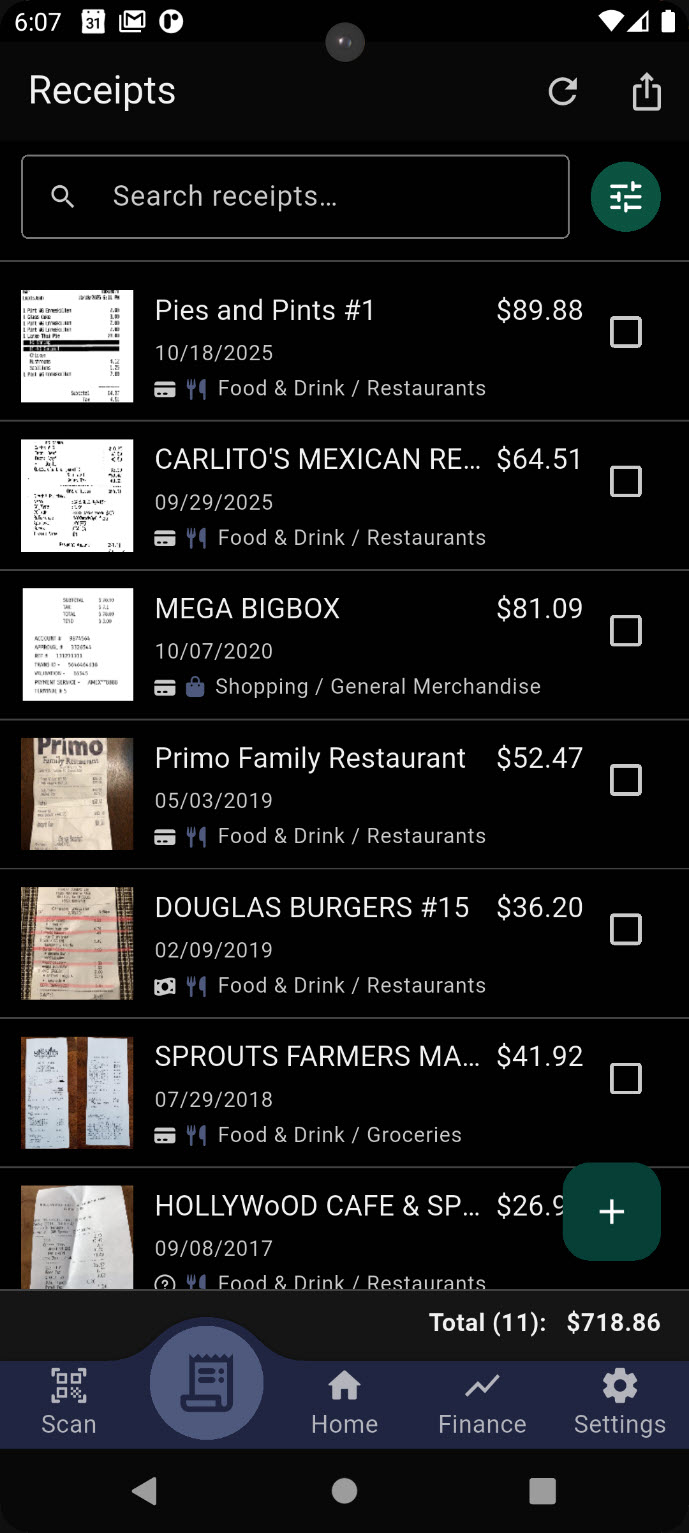
  4. Go to Receipts to view it, edit details, or view the original image.
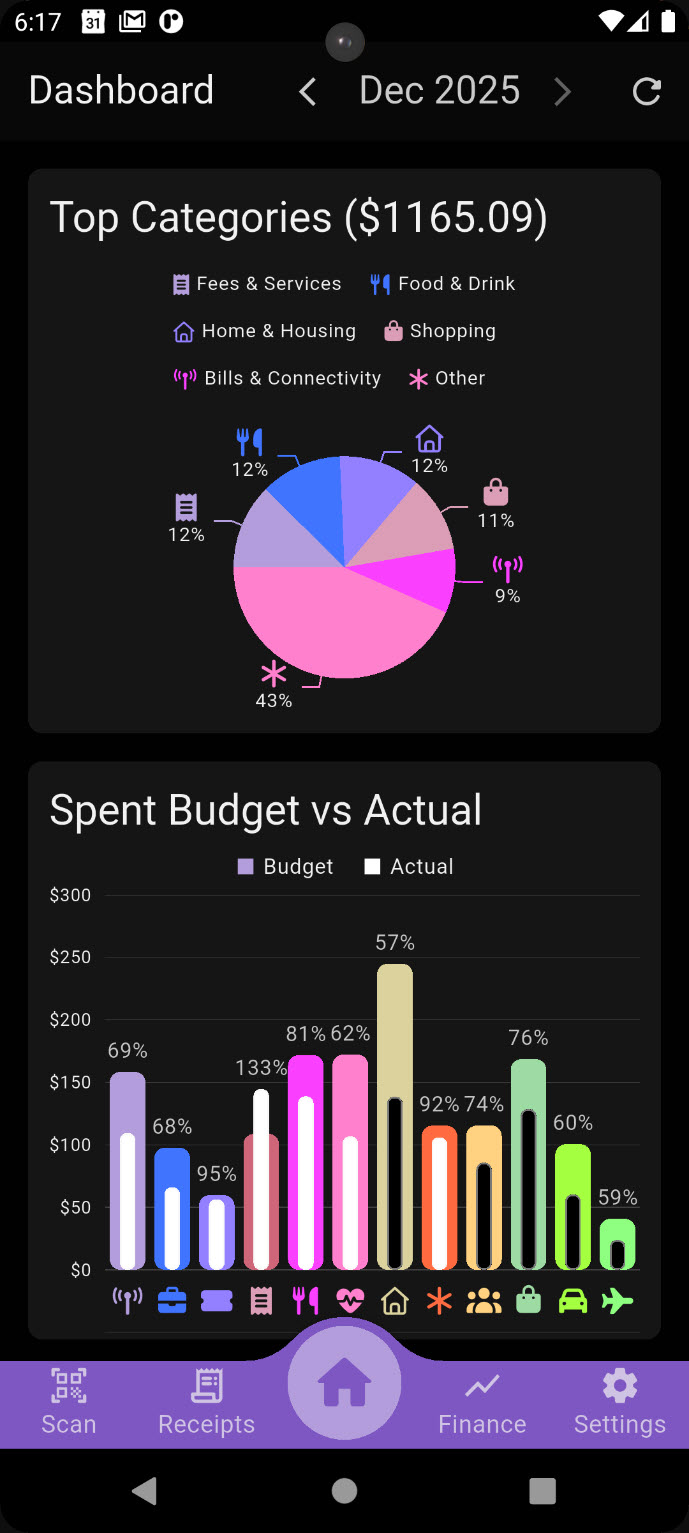
  5. Visit Home to see your dashboard update with charts for the current month.
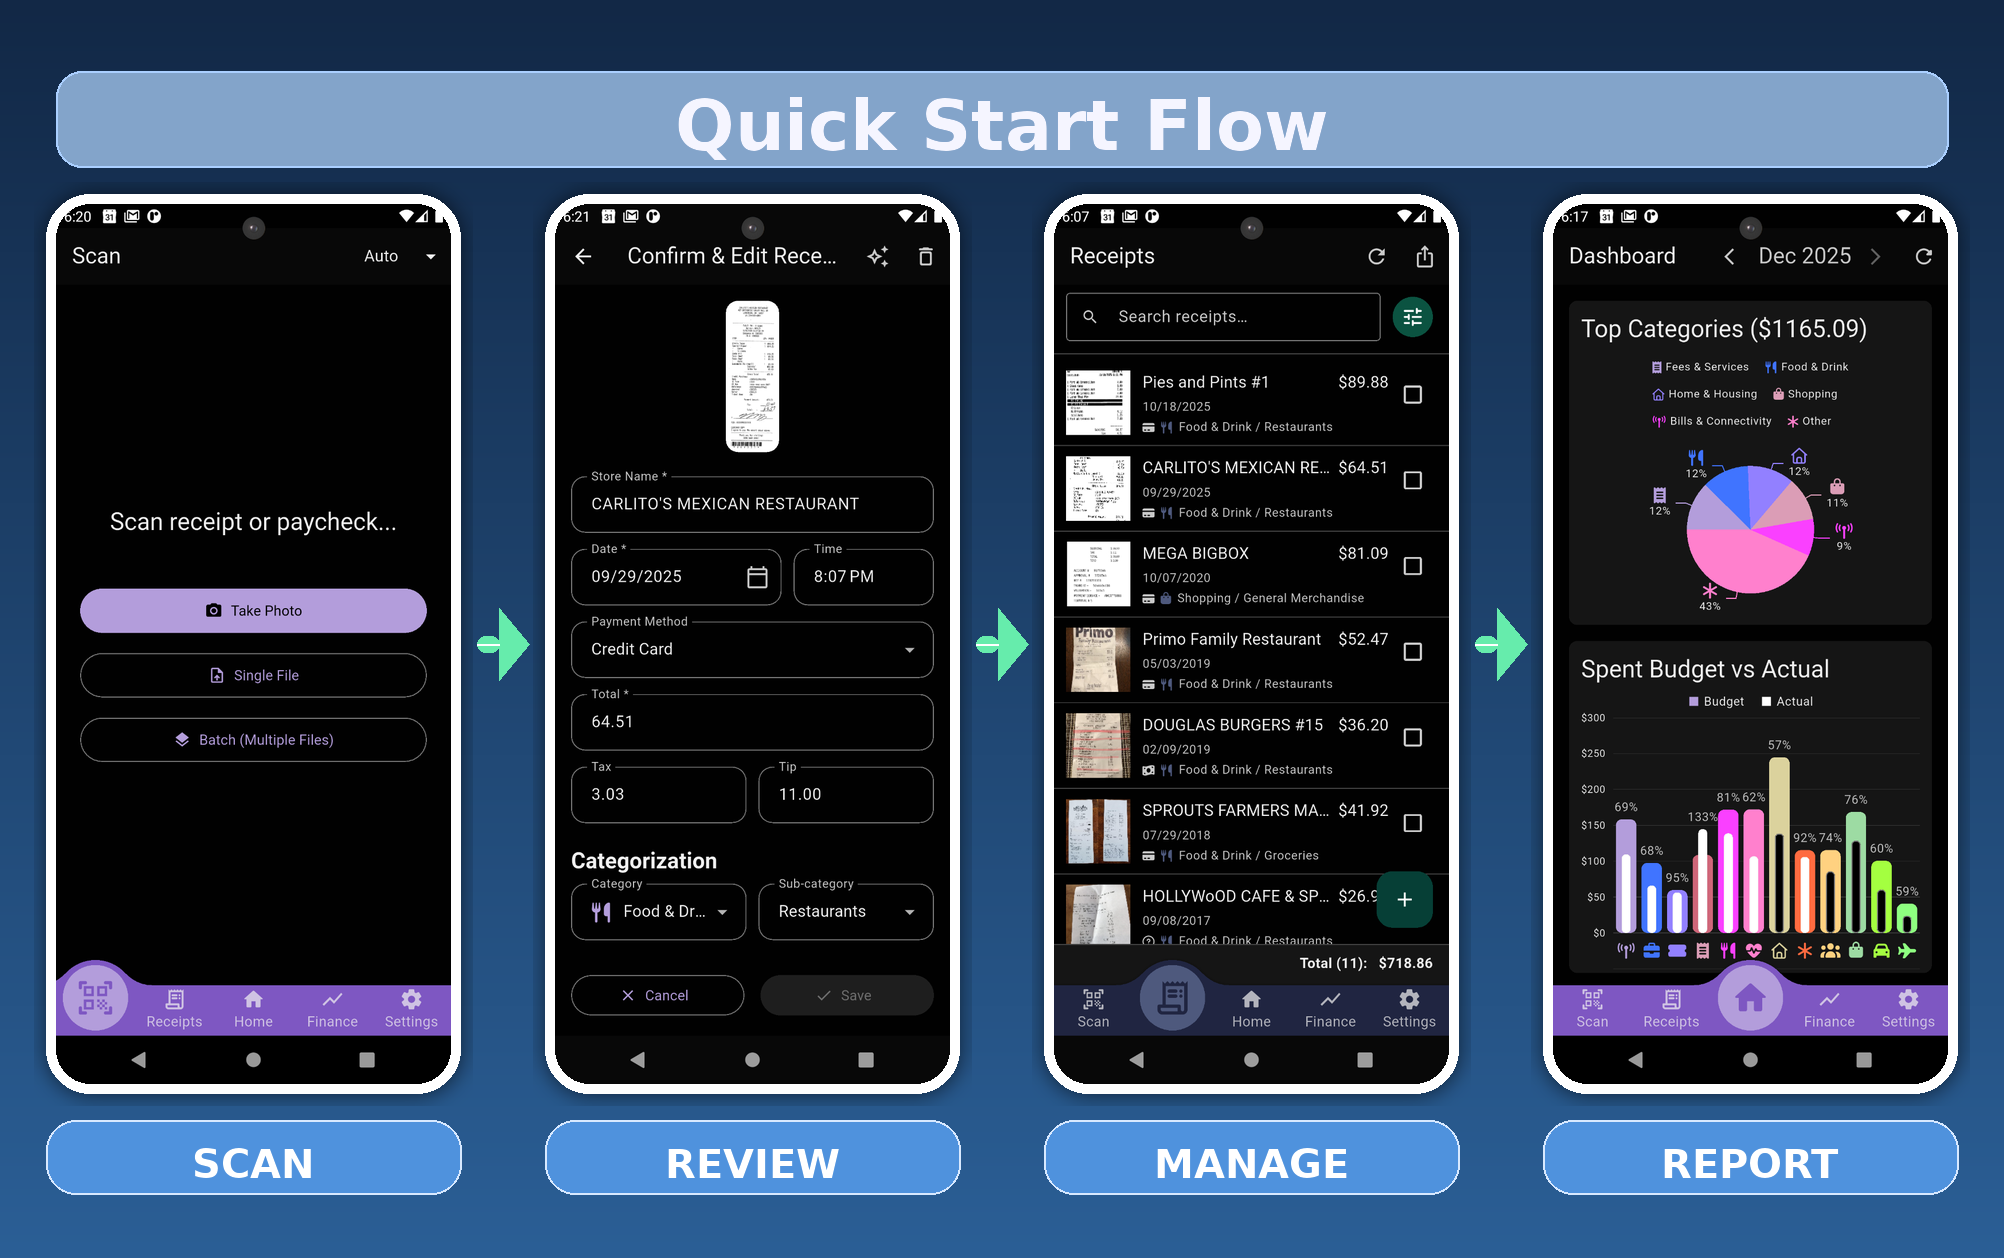
Quick start flow

Scan Widgets: one-tap capture from your desktop
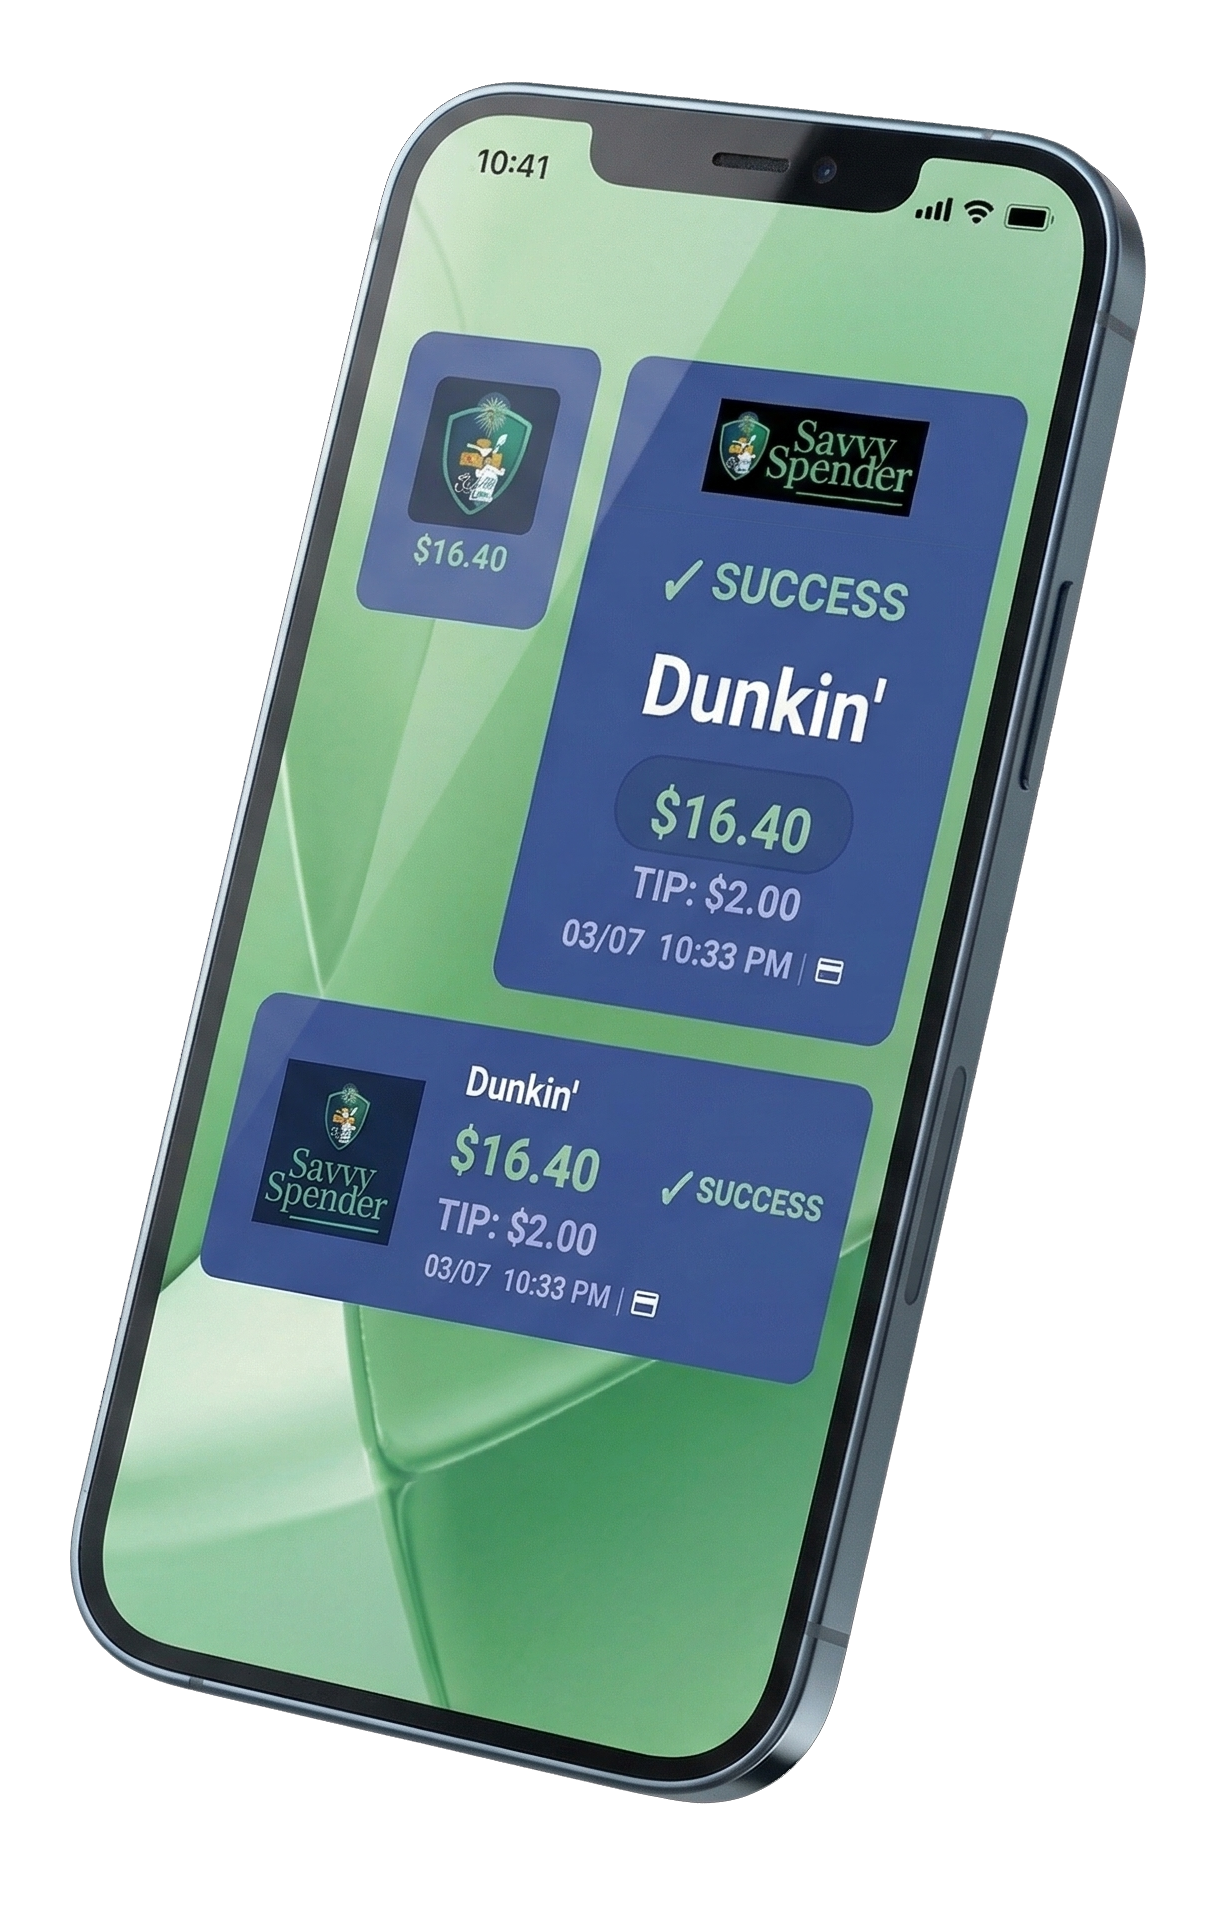
Scan Widgets let you launch receipt capture directly from your device desktop. Tap the widget once, snap the photo, and once you see the “Got it!” toast, the widget returns you to your desktop automatically. At that point, you can move on to other things, keep using your device, or simply turn off the screen and put your phone back in your pocket while Savvy Spender continues processing in the background.

  • One tap opens the camera flow fast
  • Multiple widget sizes let you choose what fits your desktop best
  • The widget updates as scan processing moves forward
  • Completion details can include store name, total, tax, and tip
  • If the item is already in your account, the scan is auto-discarded and the widget will show Duplicate
  • A push notification is sent when processing finishes
Fast workflow: Tap the widget. Capture the receipt. Wait for the Got it! toast. The widget then takes you back to your desktop automatically, and Savvy Spender continues processing in the background.

Savvy Spender widgets on a phone desktop

Android: add a widget
  1. Go to an empty area on your home screen and long-press the desktop.
  2. Tap Widgets.
  3. Find Savvy Spender in the widget list.
  4. Choose the widget size you want.
  5. Drag it onto your desktop and place it where you want it.
  6. Resize it if your launcher supports resizing.
Some Android launchers also let you start from the app icon menu, but the home screen widget picker is the most universal path.
iPhone / iPad: add a widget
  1. Long-press an empty area of the Home Screen until icons jiggle.
  2. Tap the + button to add a widget.
  3. Search for Savvy Spender.
  4. Swipe through the available widget sizes.
  5. Tap Add Widget.
  6. Move it where you want, then tap Done.
iOS and iPadOS present the sizes slightly differently than Android, but the idea is the same: choose the size that fits your desktop layout best.
How to use it after it is added
  1. Tap the widget.
  2. Capture the receipt photo.
  3. Confirm and submit.
  4. Watch for the Got it! toast.
  5. Once you see that toast, the widget takes you back to your desktop automatically. You are then free to continue using your device or turn off the screen.
What the widget can show
  • Processing progress as the scan moves through stages
  • Completion details such as store name, total, tax, and tip
  • Duplicate if the item was already saved and was auto-discarded
  • Different layouts depending on the widget size you chose
  • A matching push notification once final processing is complete
Duplicate protection: If Savvy Spender recognizes that the item has already been saved to your account, the new scan is automatically discarded. The widget will show Duplicate so you know nothing extra was added.

Group Sharing: collaborate with others

Group Sharing lets registered users collaborate inside shared groups. Once you are registered, you can create a group, invite other registered users by email, assign roles, and filter by group across lists, charts, and exportation.
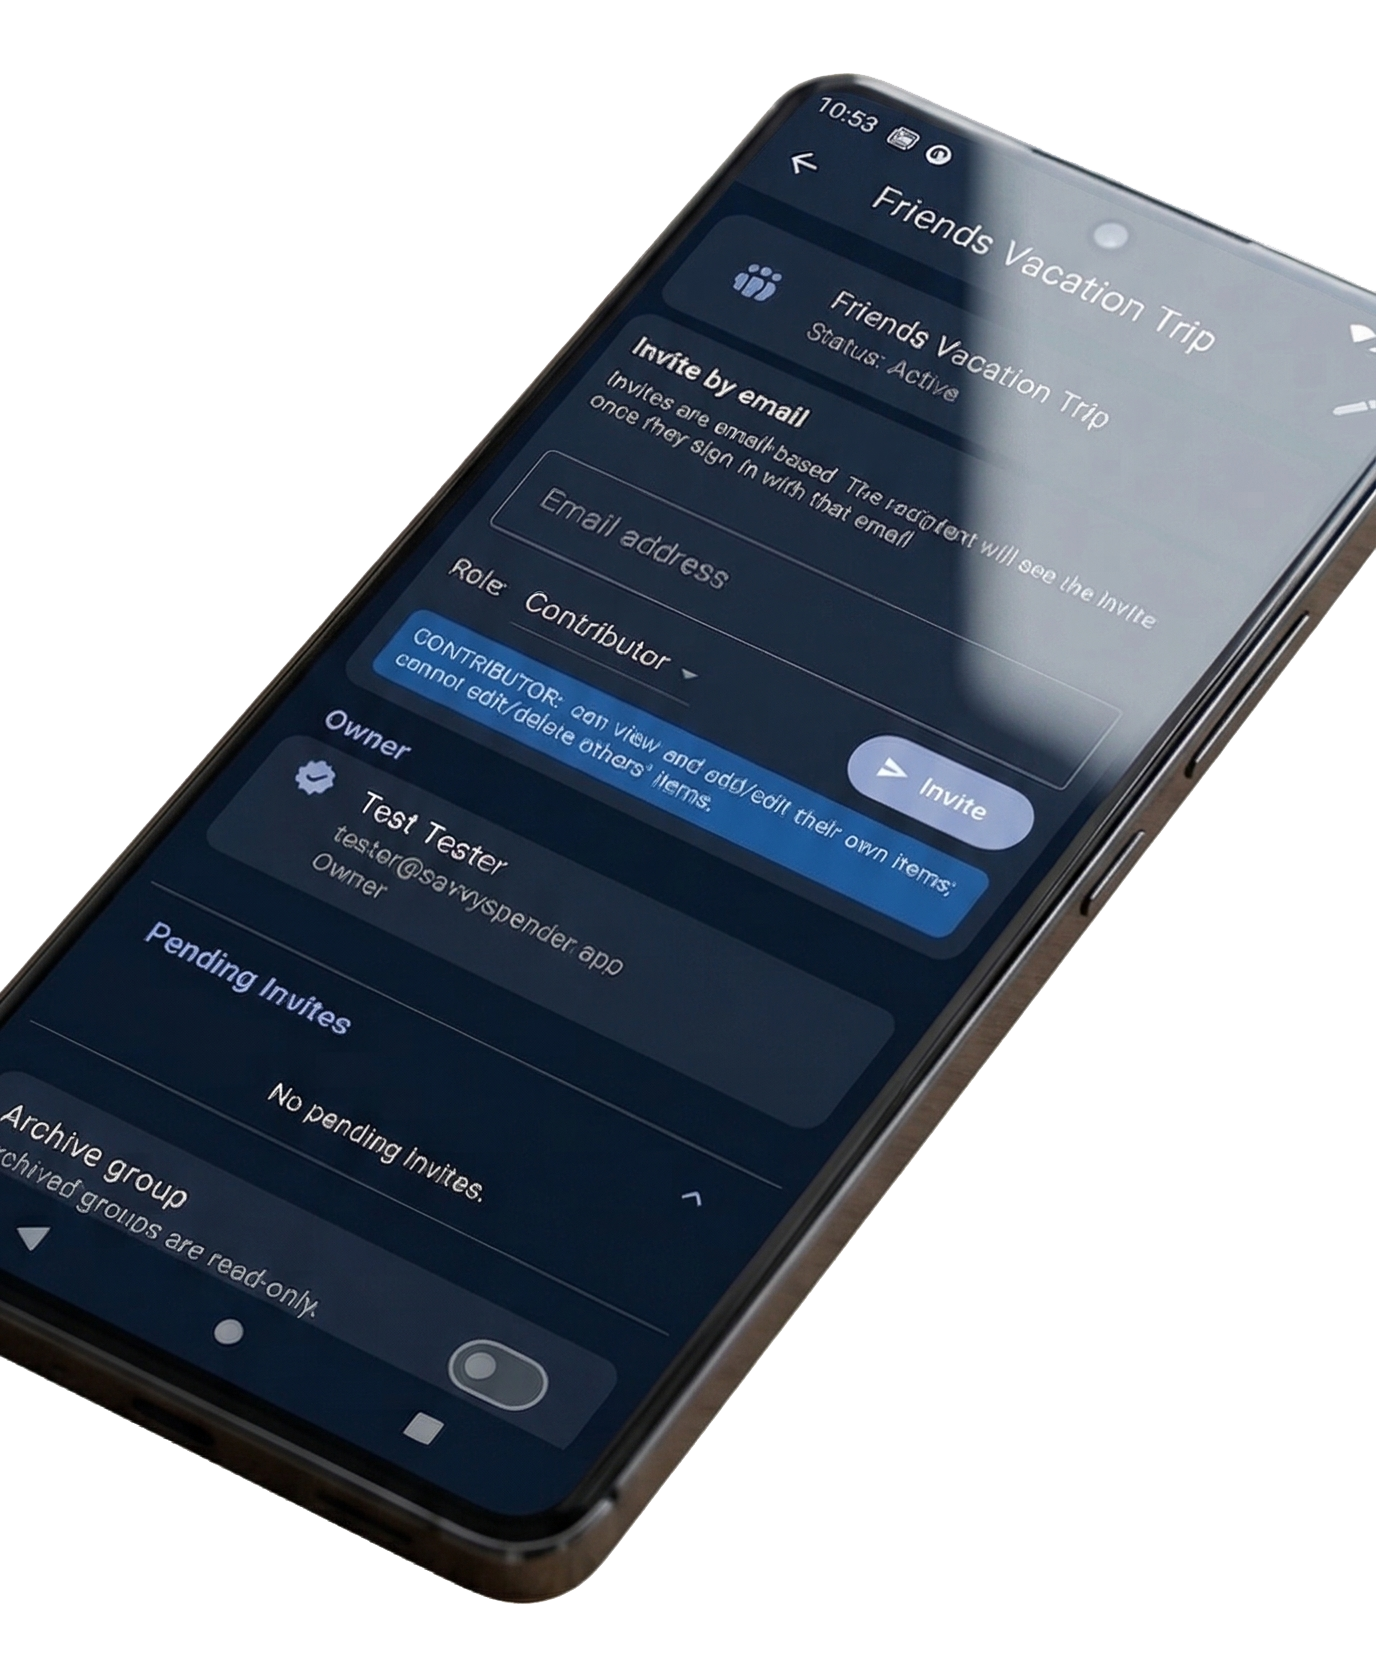
Registration required: Group Sharing is available only to registered users. The person creating the group must be registered, and every invited member must also be registered in order to join.
  • Create a group and invite others by email
  • Set roles such as Viewer, Contributor, and Admin
  • Filter lists, charts, and exports by group
  • Manage invites and membership over time
  • Collaborate with shared visibility and role-based permissions

Group Sharing on a phone

How it works
  1. Create a new group inside the app.
  2. Invite one or more people by email.
  3. Assign the correct role to each member.
  4. Once accepted, members work inside the same shared group.
  5. Use group filtering to focus on that group’s lists, charts, and exports.
Invites and membership
  • When an invite is sent, the recipient gets both an email and an in-app notification.
  • The recipient can either accept or decline the invite.
  • The group owner can rescind a pending invitation at any time.
  • The group owner or an admin can eject a member later if needed.
  • All members can see who is in the group, but only admins can also see member email addresses.
Viewer
  • Can view items in the group
  • Can report on group items
  • Cannot add, edit, or delete items
  • Cannot manage invites or members
Contributor
  • Can view, report on, and edit items
  • Can contribute new items
  • Cannot delete items contributed by someone else
  • Cannot manage invites or members
Admin
  • Can co-administer the group
  • Can manage invites and members
  • Can see member email addresses
  • Can help manage the group alongside the owner
Filtering and reporting
  • Group filters are available across lists, charts, and exportation.
  • You can focus on one specific group or switch views as needed.
  • This makes it easier to separate personal activity from household, travel, or business activity.
Why people use groups
  • Families and roommates tracking shared spending
  • Trips where several people contribute receipts
  • Small teams or businesses needing shared visibility
  • Any situation where one shared workspace should serve multiple people
Visibility note: Members can see who belongs to the group, but only admins can see member email addresses. This helps balance transparency with privacy.

Cost Split: track who paid what on a receipt

Cost Split is an optional, per-receipt feature. Turn it on only for receipts that need shared-cost tracking. When it is left off, the receipt behaves normally and Cost Split is ignored.
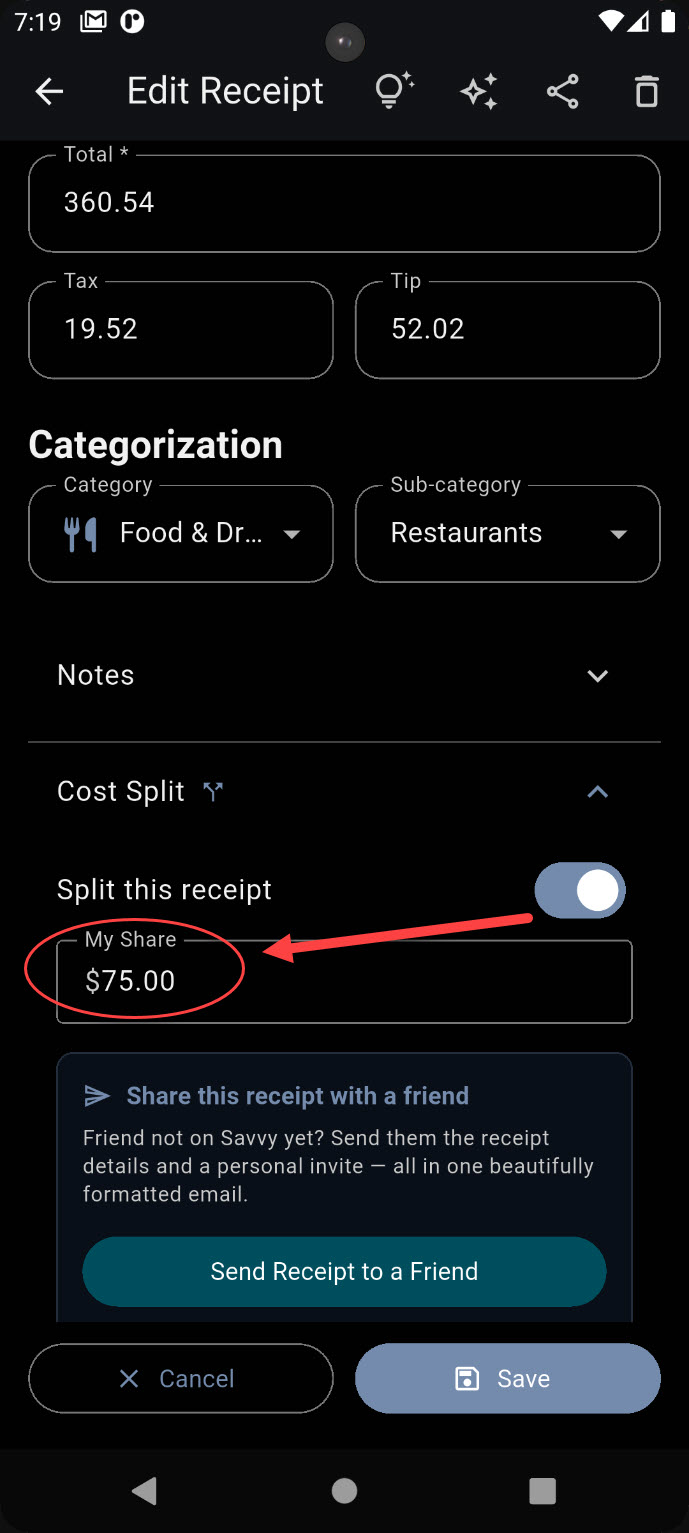
  • Enable it only on receipts that need it
  • Personal-group receipts use a single My Share amount
  • Shared-group receipts let you enter an amount for each contributing member
  • Email receipt copies to non-app users, complete with a mutual-reward referral QR code
  • The receipts list still shows the full receipt total
  • Your share is what can flow into dashboard charts and certain reports
  • A visual aid helps with the math by showing any amount that remains unaccounted for, which is allowed
Designed to be flexible: Cost Split is handled one receipt at a time. This keeps ordinary receipts simple while still giving you a way to split up restaurant tabs, travel costs, household purchases, or any other shared expense when needed.

Cost Split tracking feature

Personal group behavior
  • If the receipt belongs to your Personal group, you simply enter your amount into My Share.
  • The receipt itself still retains its full total.
  • Your entered share is what can be reflected in dashboard charts and certain reports.
Shared group behavior
  • If the receipt belongs to a shared group, you can enter an amount for every member who is contributing.
  • This makes it easier to record who covered what portion of a shared bill.
  • The visual helper shows how much of the receipt remains unassigned so you can decide whether to account for the rest or leave it unaccounted for.
Sharing with non-app users

You can easily email a copy of the receipt and its cost-split details to friends who don't use Savvy Spender. The email includes a special referral QR code—if they decide to try out the app using your code, both of you will receive a reward!

Important distinction: The total receipt amount continues to appear in the receipt list view, but Cost Split lets Savvy Spender use the share amounts where appropriate for dashboards and certain reports. That way, you can preserve the full bill for record-keeping while still tracking the portion that matters to you or to each participating member.

Tax Deductions: tagging and year-end summaries

Designed for self-employed users and freelancers, the Tax Deduction feature allows you to mark specific receipts and income items as tax-deductible and assign them to standard IRS categories.
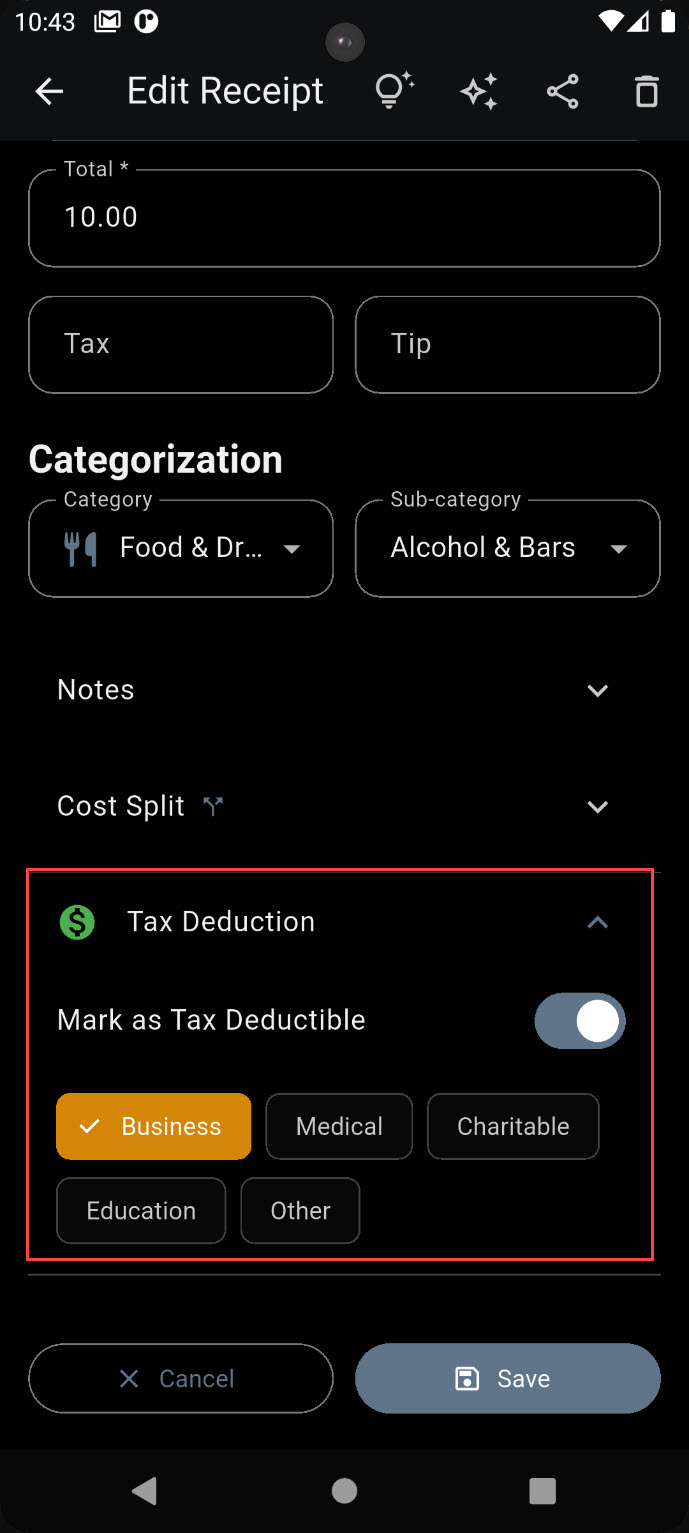
  • Toggle the "Deductible" switch on any item
  • Select an IRS category (Business, Medical, Charitable, Education, Other)
  • Filter your receipt and finance lists by deduction status
  • Generate a Year-End Tax Summary report for easy filing
Year-End Prep: By tagging expenses as they happen, your Year-End Tax Summary report is automatically built in the background, saving you hours during tax season.

Tax deduction tagging feature

Tagging an Item
  • Open any receipt or income item from your lists.
  • Tap the Deductible toggle to mark it for tax purposes.
  • A dropdown will appear allowing you to select the appropriate IRS Category.
  • Save your changes to update the item.
Year-End Summary Report
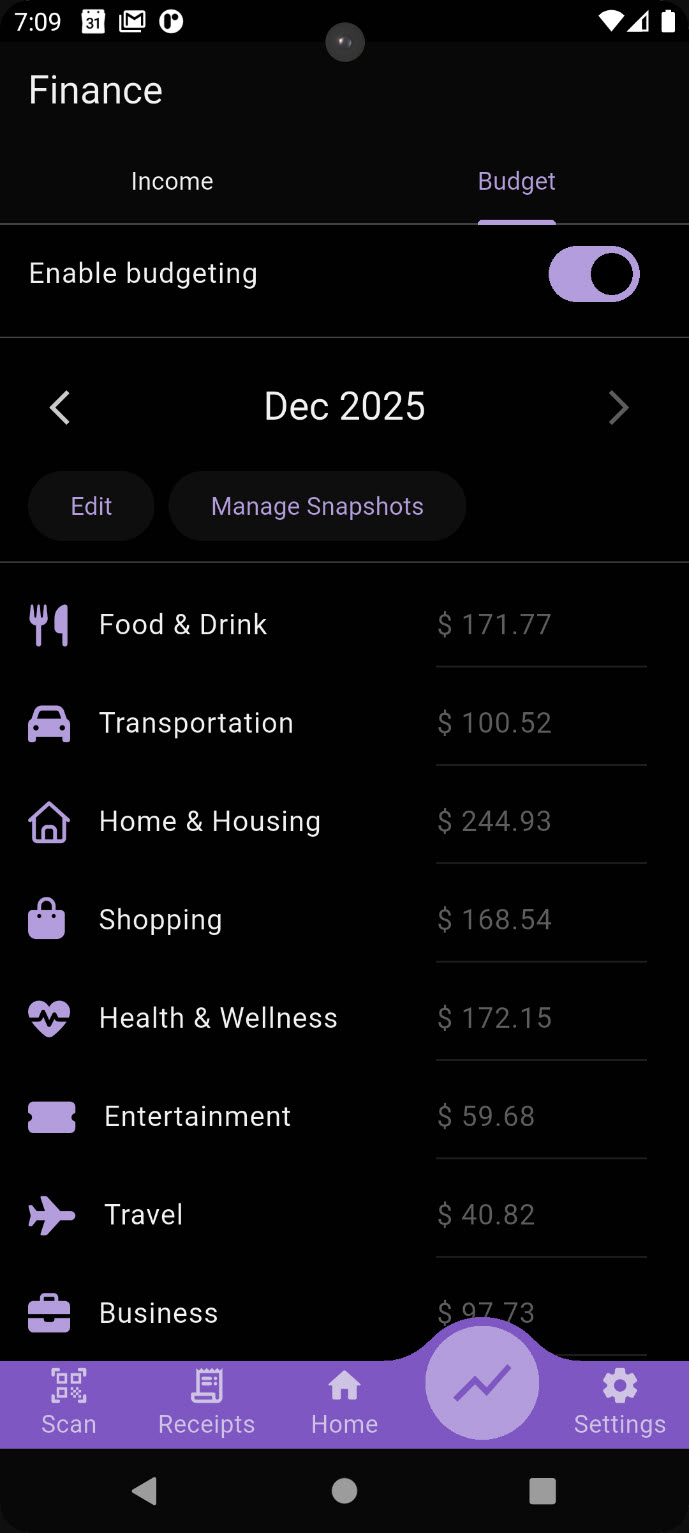
  • Navigate to the Finance or Settings tab (depending on your layout) to access Reports.
  • Select the Year-End Tax Summary.
  • This report groups all your tagged items by IRS category, providing exact totals to hand over to your accountant or use in tax software.

Filters and exports

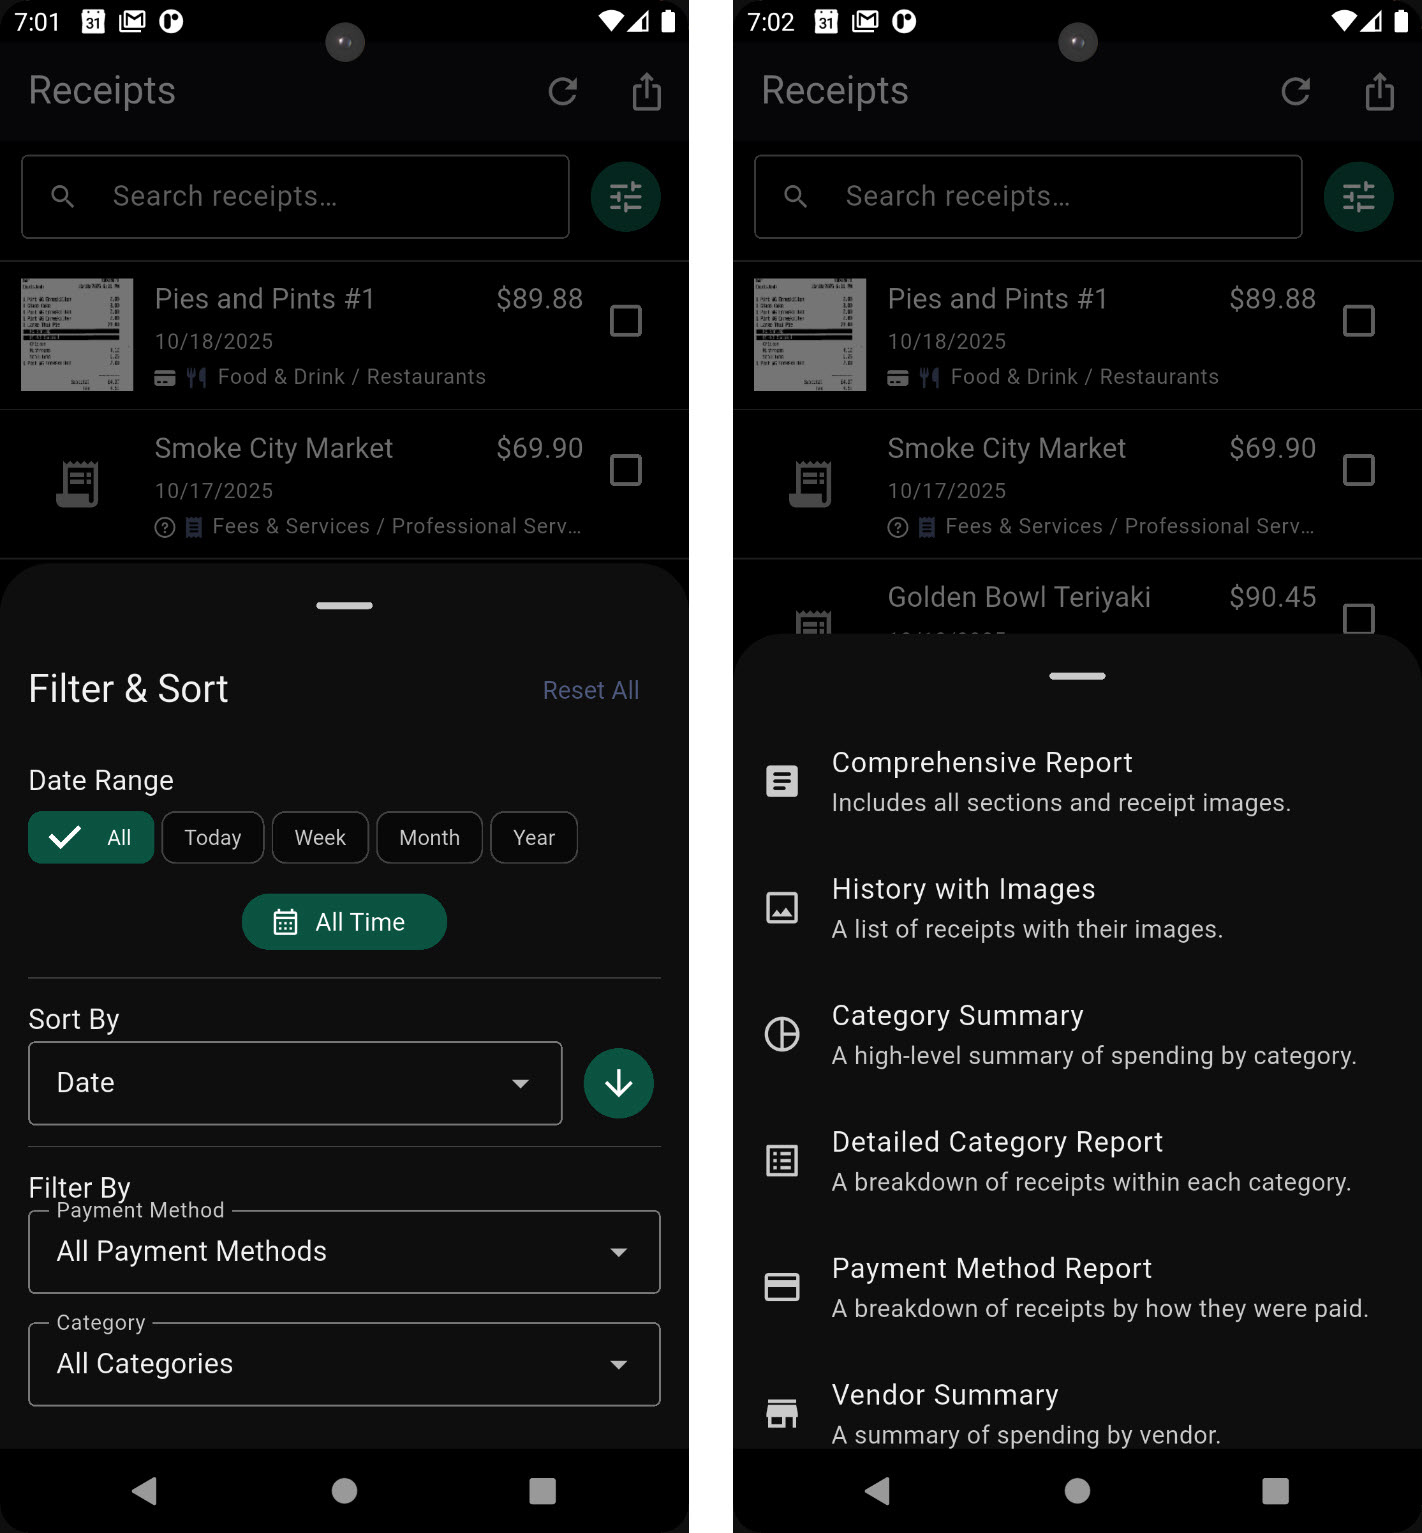
Both the Receipts and the Finance tabs include filters and export options so you can focus on exactly what you need.

  • Filtering: Use filters to narrow results by time period, deductible status, IRS category, and other available criteria.
  • CSV export: Available to all users.
  • PDF reports: Available during the trial and to paid users.
Plan note: Free users have a limited history look-back after the trial. If you need older data, the app will guide you with upgrade options.
Filters and exports

Scanning Examples

We’ve included several sample items to demonstrate how Savvy Spender handles a range of real-world scanning scenarios. These examples show how different types of items are interpreted, what information can be captured, and what you can do to improve scan success. Along the way, you’ll also find practical tips for maximizing accuracy, keeping your records organized, and building cleaner, more useful financial history over time.
SUGGESTION:   you may wish to download / scan these images for testing within your own account.
Tip: Tap or click any example image to open a larger view. Use the viewer controls to zoom, reset, or download the image.

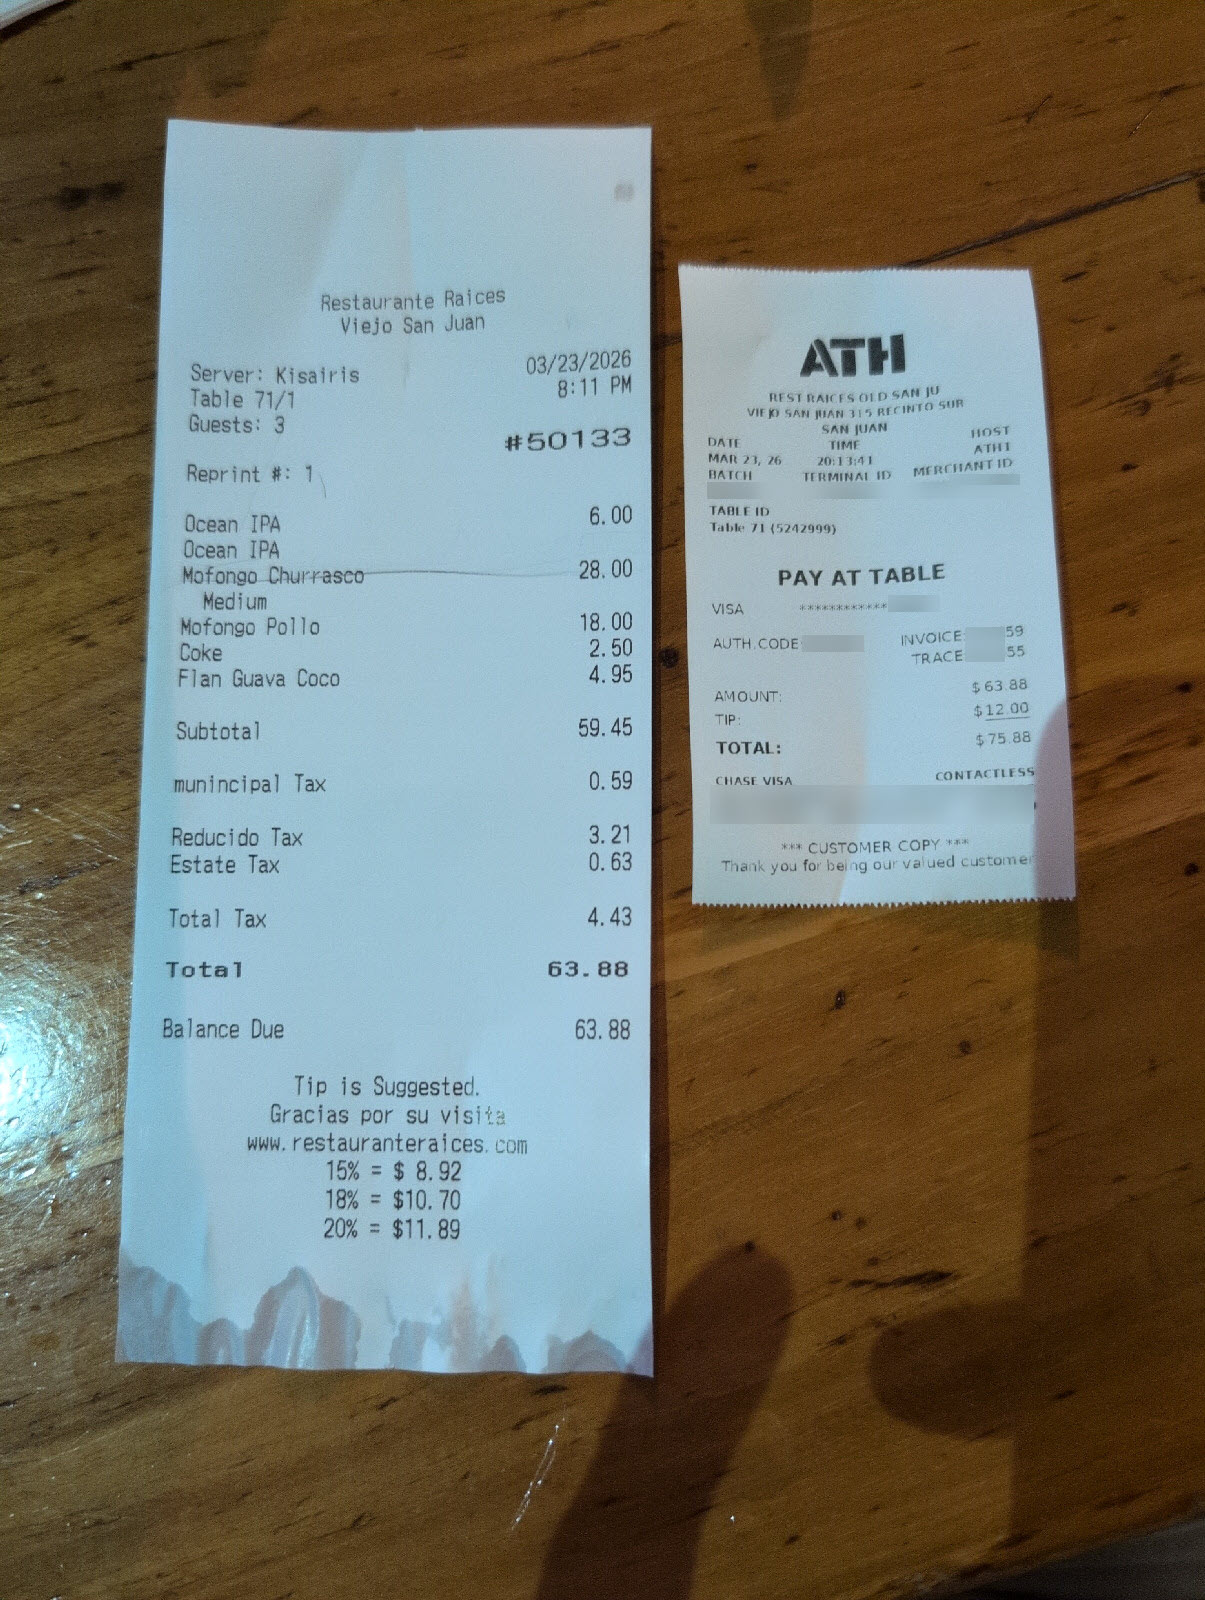
Restaurant receipt with split tip across companion slips Tap / click to enlarge
Receipt example Split tip scenario Companion slips
What makes this example important
  • Two related slips in one visit: The main restaurant check contains the ordered items and taxes, while the smaller payment slip contains the card result, gratuity, and final charged amount.
  • Tip is split away from the main check: This is a good example of a restaurant workflow where the pre-tip total and the final charged total do not appear together in one simple totals block.
  • Good test for reconciliation: Savvy Spender should preserve the item detail from the main receipt while also recognizing that the companion slip changes the final paid amount.
What Savvy Spender should notice

This sample is useful for testing restaurant transactions where the receipt total, tip amount, and final charge do not all appear in the same printed area. It helps verify whether Savvy Spender can recognize the base receipt total first, then pull in the added gratuity and final charged total from the separate payment slip.

Particulars to emphasize: The itemized restaurant receipt shows the food and tax detail, while the separate ATH card slip shows a $12.00 tip and a higher final charged amount than the original receipt total. This is exactly the kind of split-tip case that can confuse simpler scanners.

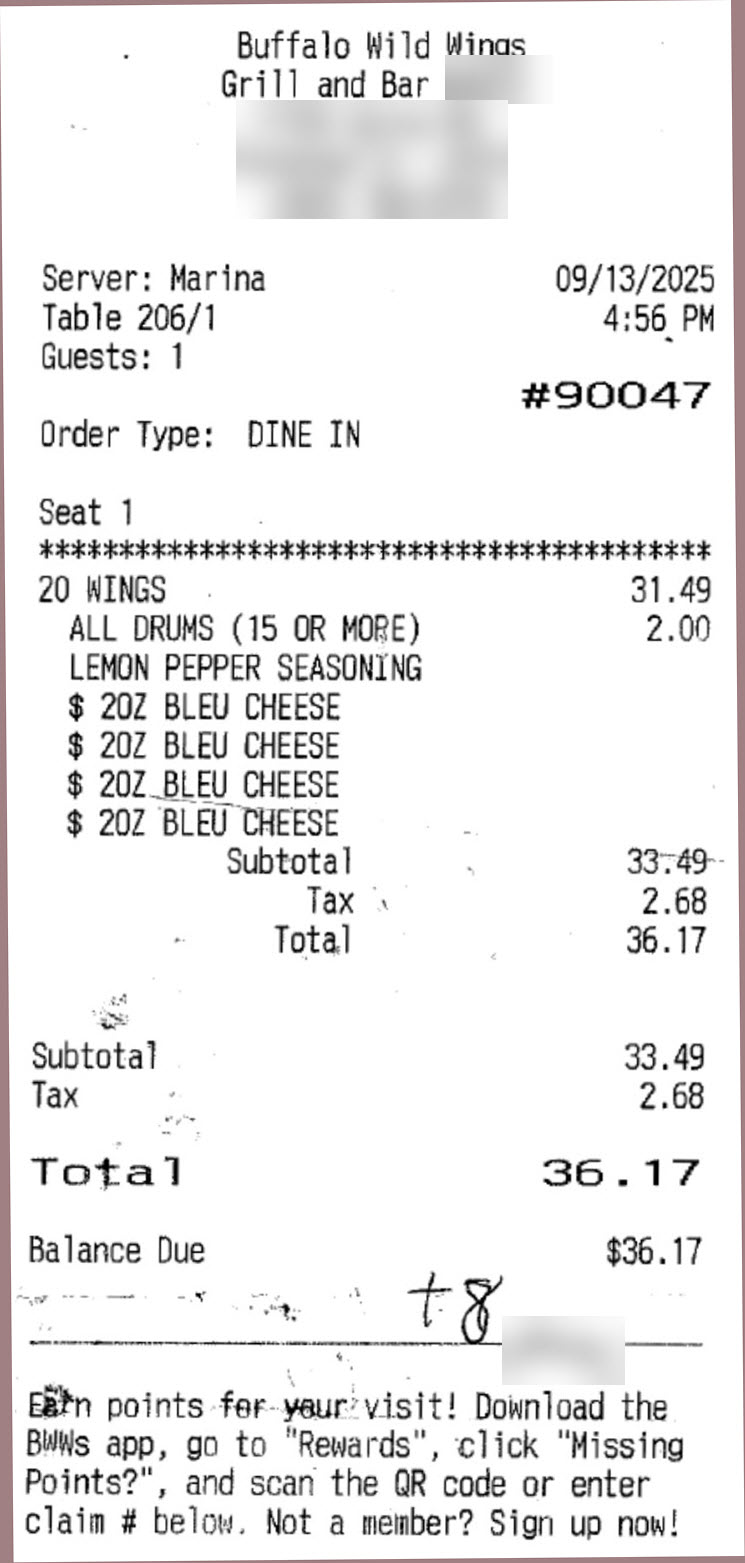
Restaurant receipt with handwritten tip added without a labeled tip line Tap / click to enlarge
Receipt example Handwritten tip No printed tip line
What makes this example important
  • Handwritten adjustment after the printed totals: The receipt already shows its printed subtotal, tax, total, and balance due, but a handwritten amount appears later near the bottom.
  • No clearly labeled gratuity field: This is useful for testing cases where a customer writes in an added amount even though the receipt does not present a neat, obvious tip line in the final signature area.
  • Tests handwritten-addition detection: Savvy Spender must decide whether the handwritten amount represents an added gratuity, a note, or some other post-print adjustment.
What Savvy Spender should notice

This sample helps test whether the app can preserve the original printed total while still recognizing that a handwritten amount was added afterward. It is especially useful for edge cases where the gratuity is implied by placement and handwriting rather than by a clearly printed label.

Particulars to emphasize: This Buffalo Wild Wings receipt shows its printed total first, and then a handwritten +8 appears near the lower signature area. There is no clearly written handwritten final total directly below it, which makes this a useful example of a gratuity added informally rather than through a clean printed tip workflow.

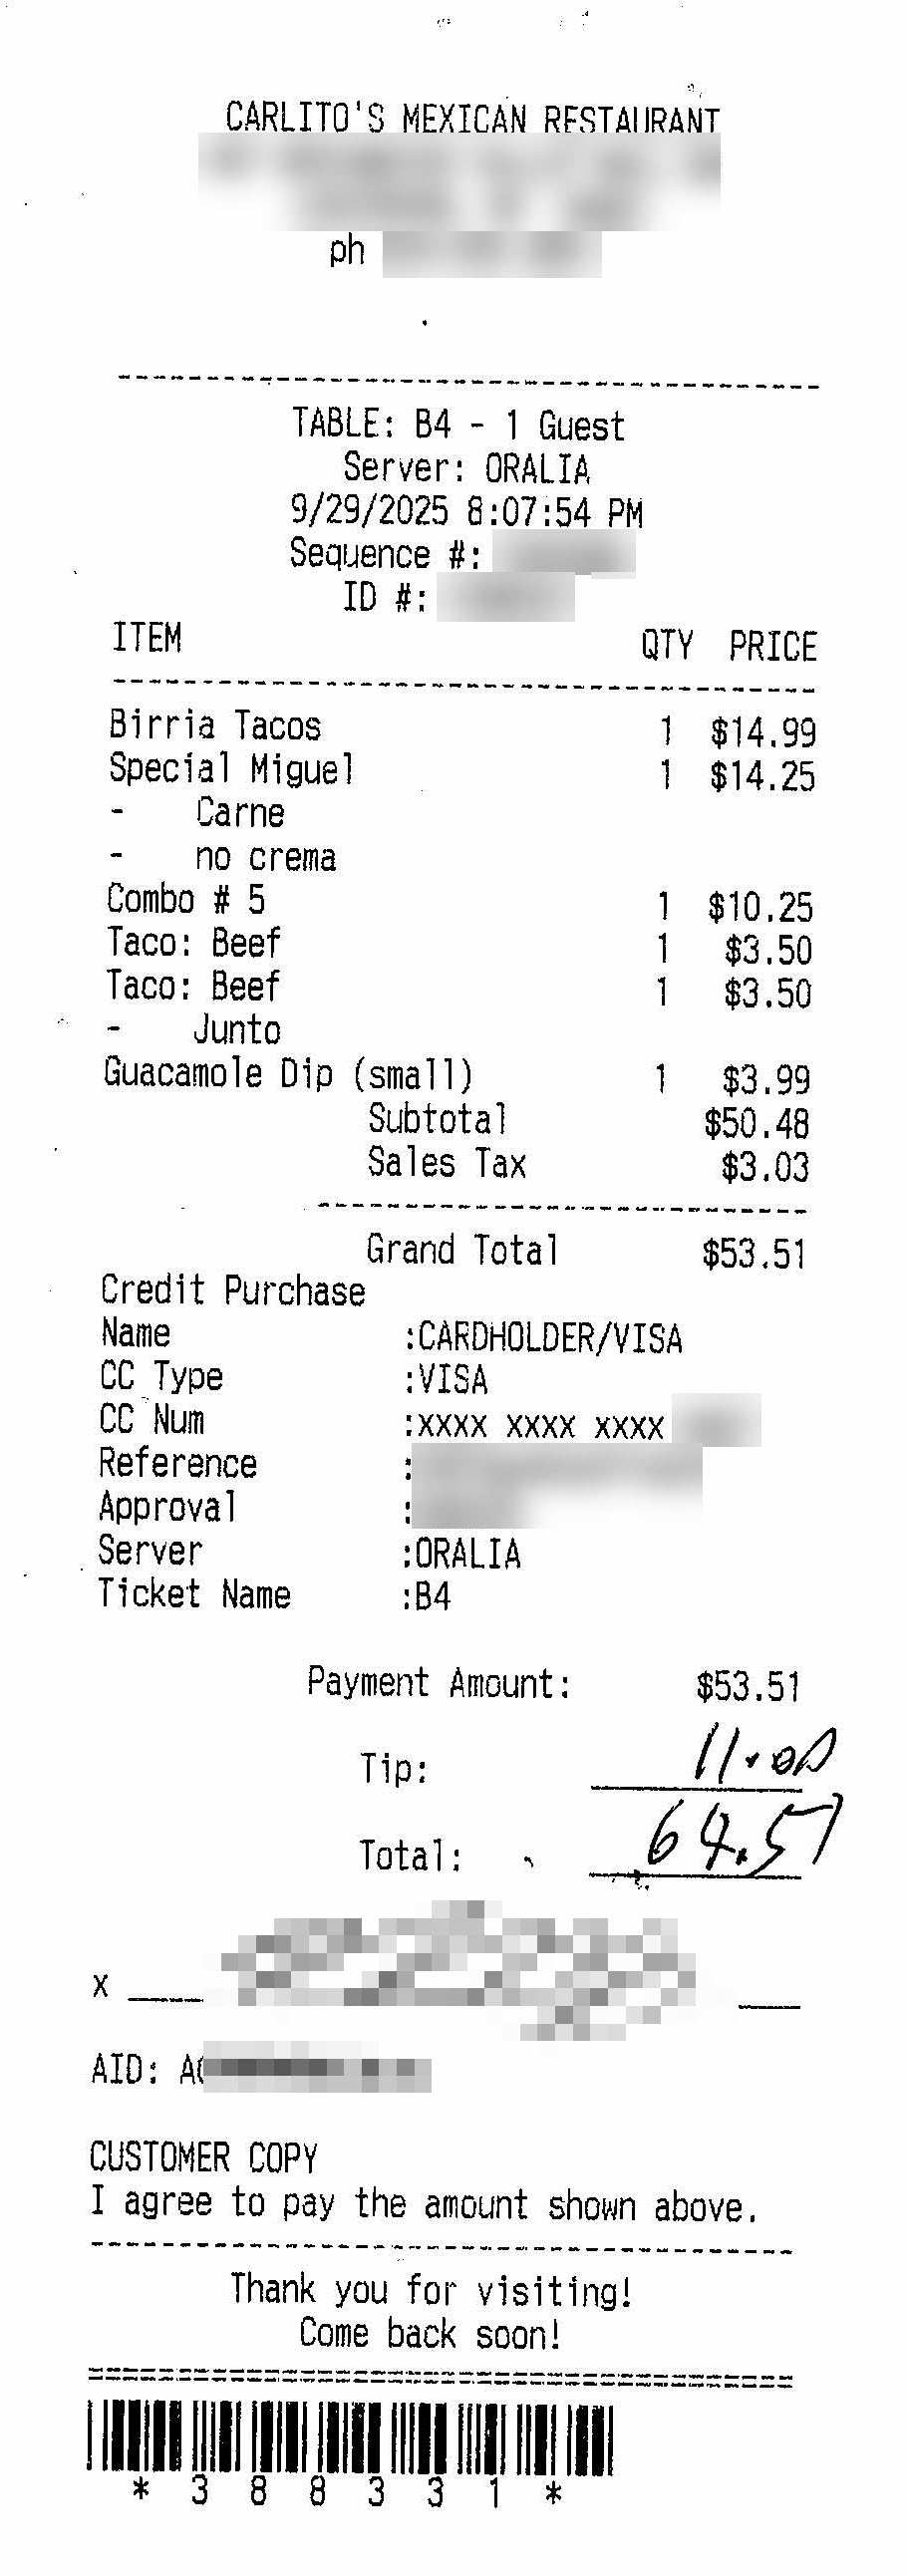
Restaurant receipt with handwritten tip and handwritten final total Tap / click to enlarge
Receipt example Handwritten tip Handwritten final total
What makes this example important
  • Printed total versus paid total: The receipt shows a printed charge amount first, then a handwritten gratuity and a handwritten final amount added later.
  • Tests handwriting interpretation: Savvy Spender must determine whether the handwritten figures should override or supplement the printed totals.
  • Good restaurant edge case: Many restaurant receipts look complete at first glance, but the actual amount paid is only visible after the customer writes in the tip and new total.
What Savvy Spender should notice

This sample helps verify whether the app can separate the original transaction amount from the later handwritten gratuity. It also helps test whether the scanner can use the handwritten final total as the true paid amount without losing the original printed grand total or payment amount.

Particulars to emphasize: This Carlito’s receipt shows a printed charge first, then a handwritten tip and a handwritten final amount below. That makes it a strong example of a tip that is added after the printed receipt is generated, with the real paid total appearing only in handwriting.

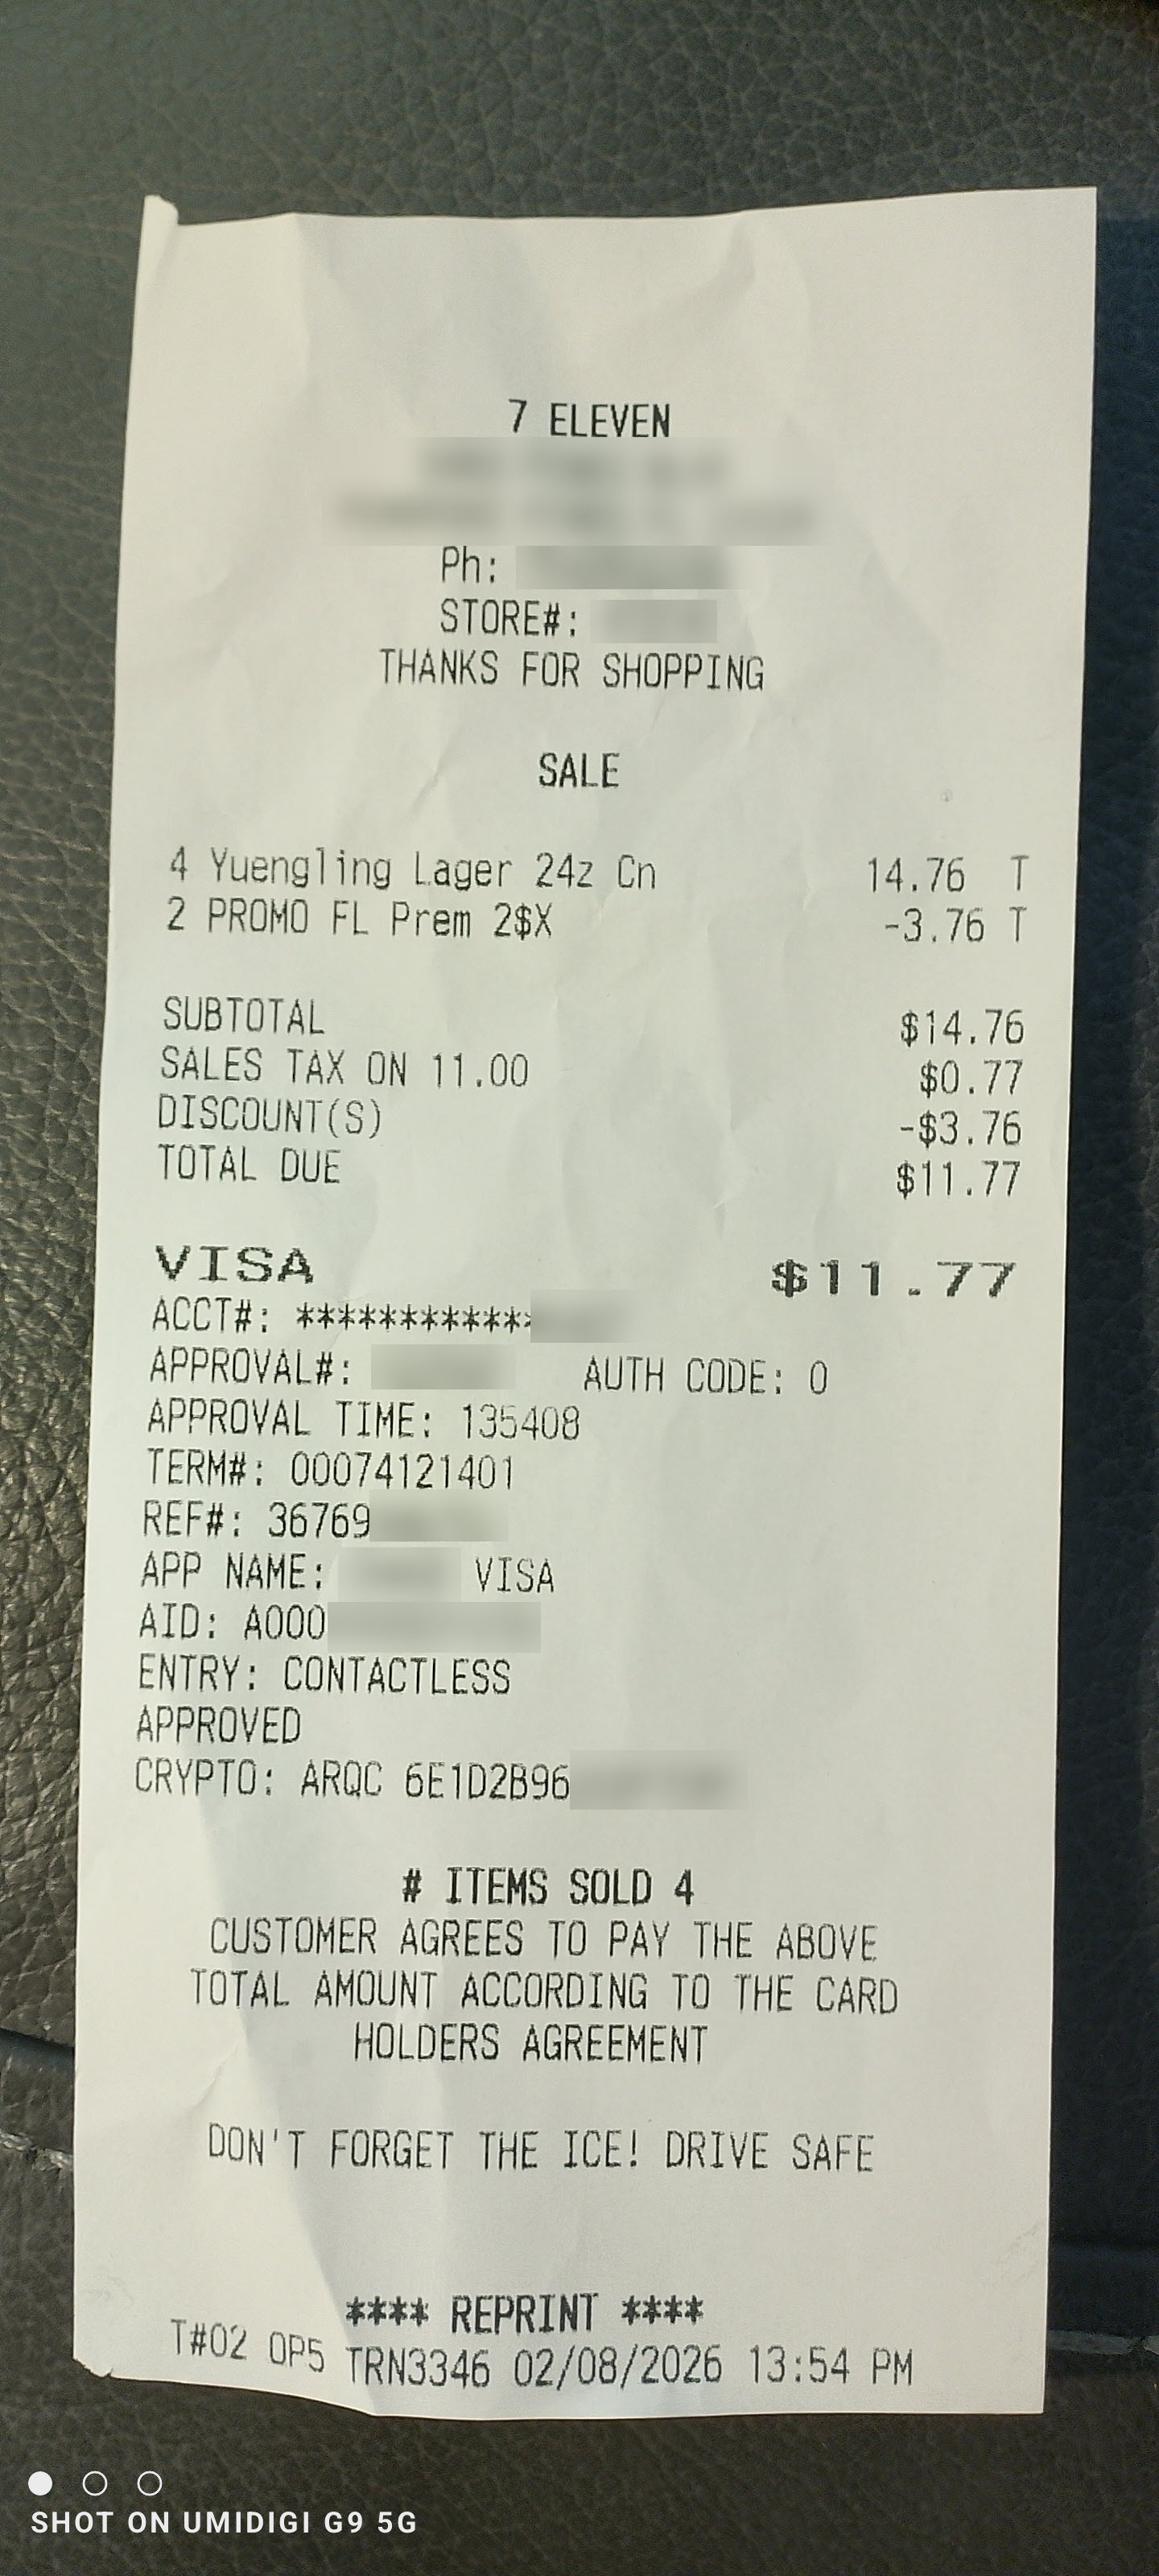
Convenience-store receipt with tax detail and discount Tap / click to enlarge
Receipt example Discount scenario Tax detail
What makes this example important
  • Explicit discount line: The receipt shows a clearly printed discount that reduces the final amount due.
  • Tax is not applied to everything: The tax line references only a portion of the subtotal, which is common when some items are taxed and others are not.
  • Good test for net totals: Savvy Spender should preserve both the original purchased amount and the reduction from the discount without losing the actual final paid total.
What Savvy Spender should notice

This sample is ideal for checking whether discounts and selective taxation are interpreted correctly. It helps confirm that the app can distinguish subtotal, tax, discounts, and final due amount instead of assuming tax was applied to the full pre-discount subtotal.

Particulars to emphasize: This 7-Eleven receipt includes a DISCOUNT(S) line and a tax line that explicitly says SALES TAX ON 11.00, even though the subtotal shown is higher. That makes it a strong real-world example of partial-tax and discount logic.

Historical handwritten receipt with an out-of-range date Tap / click to enlarge
Receipt example Historic document Out-of-range date
What makes this example important
  • Extremely old receipt: This is not a modern printed store receipt. It uses an aged paper form, handwritten entries, and a date from a much earlier era.
  • Tests date validation: A scanner may read the year correctly, but the system still enforces a minimum permitted receipt date.
  • Tests messy-document handling: Faded print, handwriting, and an unusual layout make this a strong example for edge-case OCR and extraction behavior.
What Savvy Spender should notice

This sample is useful for showing how the app behaves when a document is technically readable but falls far outside ordinary modern receipt expectations. It helps test date safeguards, manual correction workflows, and extraction from difficult handwritten material.

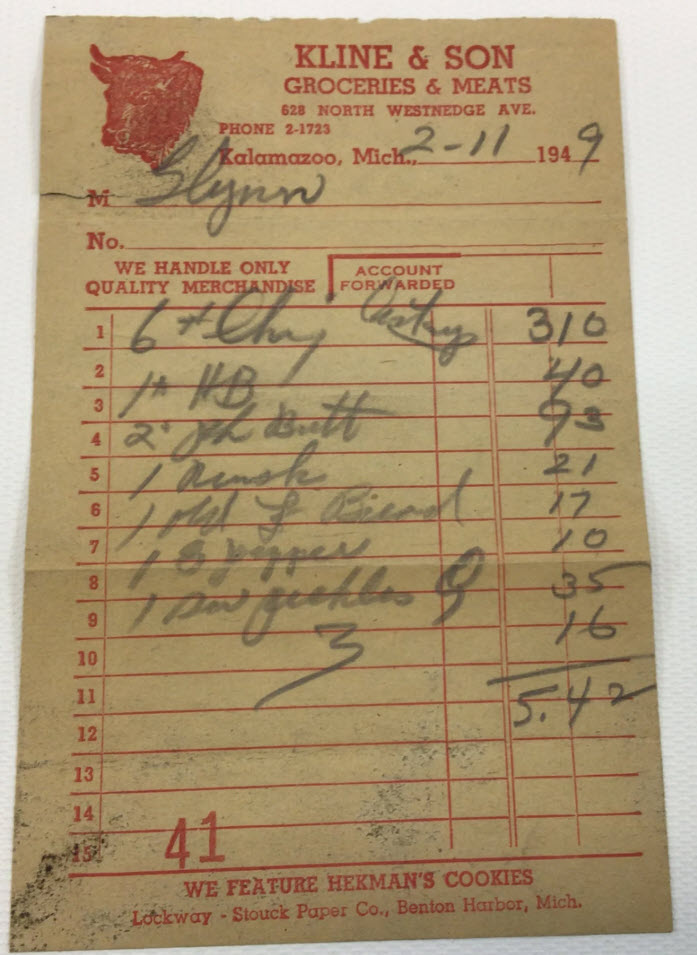
Particulars to emphasize: The receipt appears to be from 1949, is handwritten, and uses a very old grocery ledger-style format rather than a modern point-of-sale layout. In Savvy Spender, 01/01/2000 is the oldest date currently permitted in the system, so this example is intentionally outside the allowed date range and is useful for testing validation behavior.

Two-page grocery receipt with continuation from front to back Tap / click to enlarge
Receipt example Two-page receipt Long grocery list
What makes this example important
  • Continuation across pages: The second image continues the first rather than representing a separate purchase.
  • Dense grocery detail: It includes many individual items, produce weights, and category sections, making it a good stress test for longer item lists.
  • Tests page-order logic: Savvy Spender should understand that both pages belong to one transaction and that the second page completes the item detail instead of replacing it.
What Savvy Spender should notice

This sample is ideal for testing longer grocery receipts that span multiple pages or images. It helps confirm that the app can keep the transaction together, maintain item continuity from one page to the next, and still preserve the final total correctly.

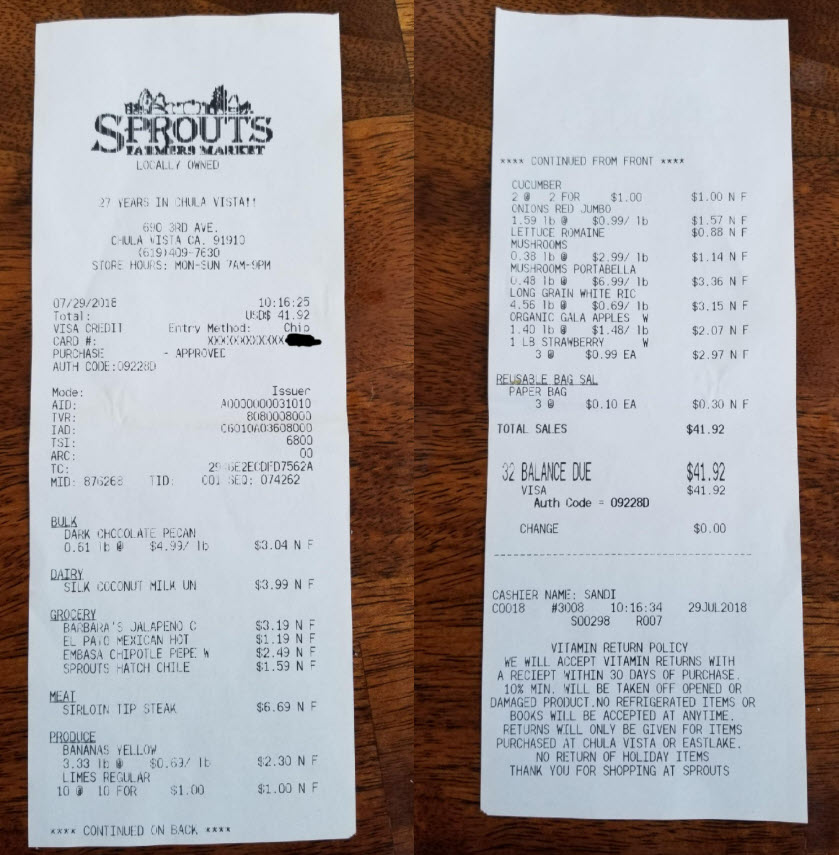
Particulars to emphasize: This Sprouts Farmers Market receipt explicitly continues from the front onto a second page and contains numerous grocery and produce lines, including weighted items. It is a strong example of a receipt that is too long to fit naturally into a single simple page capture.

Tips and troubleshooting

When should I re-scan a receipt?
  • If the merchant, date, totals, or categories do not look right.
  • If the image was blurry or partially cut off.
  • If you want to re-run an older receipt after app improvements.
My dashboard does not look updated.
  • Confirm you are viewing the correct month on Home.
  • Check that your receipt or income item was saved successfully in Receipts or Finance.
  • If you recently edited items, return to Home and refresh the view, as available in the app version.
I cannot export to PDF.
  • PDF reports are available during the trial and to paid users. CSV export remains available to all users.
Where do I manage my account?
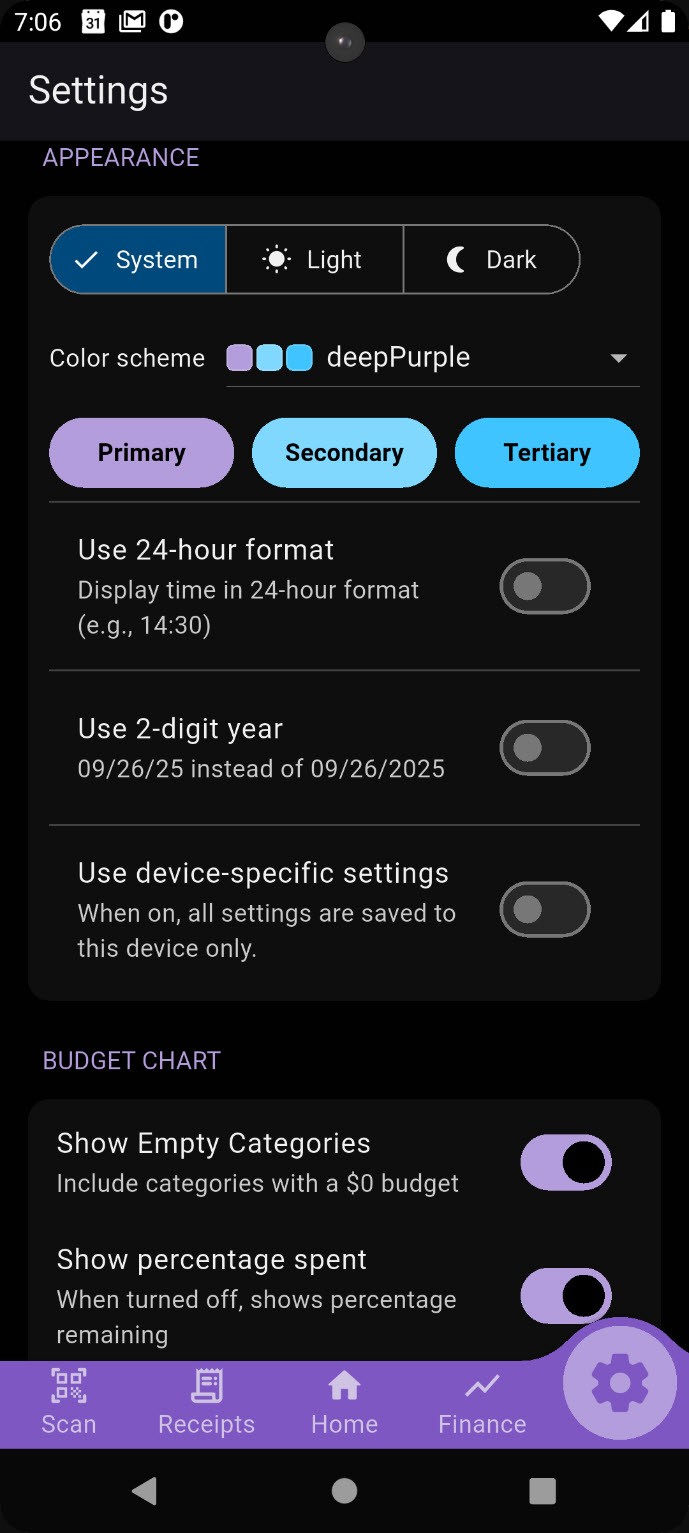
  • Go to Settings for email and password updates, data deletion, referrals, category management, and personalization.
FAQ